Intelligent OTA | Host MCU OTAs Tab
This tab enables you to create, edit, and manage OTAOver-the-Air updates. Customers who have OEM admin permissions in the Ayla Customer Dashboard can use this tab to accomplish the following:
- Identify the group of device serial numbers (DSNs) for the device firmware images that you uploaded in the Ayla platform using the Host MCU Images tab. (The images are pushed to that group of DSNs.)
- Report on the status of OTA firmware runs to provide operations teams with a clear understanding of the outcome of current and historic OTA runs.
- Perform remote management functions, including monitoring, updates, and storage and management of host MCU and Ayla firmware images.
- Organize and index hierarchical or dynamic device groups and perform any action over-the-air (OTA) for multiple devices in real-time or on a schedule.
Below are instructions on how to create and edit OTA jobs for Host MCU and Ayla Module firmware images, and how to use the OTA remote management features.
- Navigate and log in to the Ayla Customer Dashboard using your current log-in credentials.
|
NOTE |
These are the credentials you set up to register for a developer’s account. If you have not done this, refer to the Ayla Developer’s Portal User’s Guide, AY006UDP3 on Ayla Connection. |
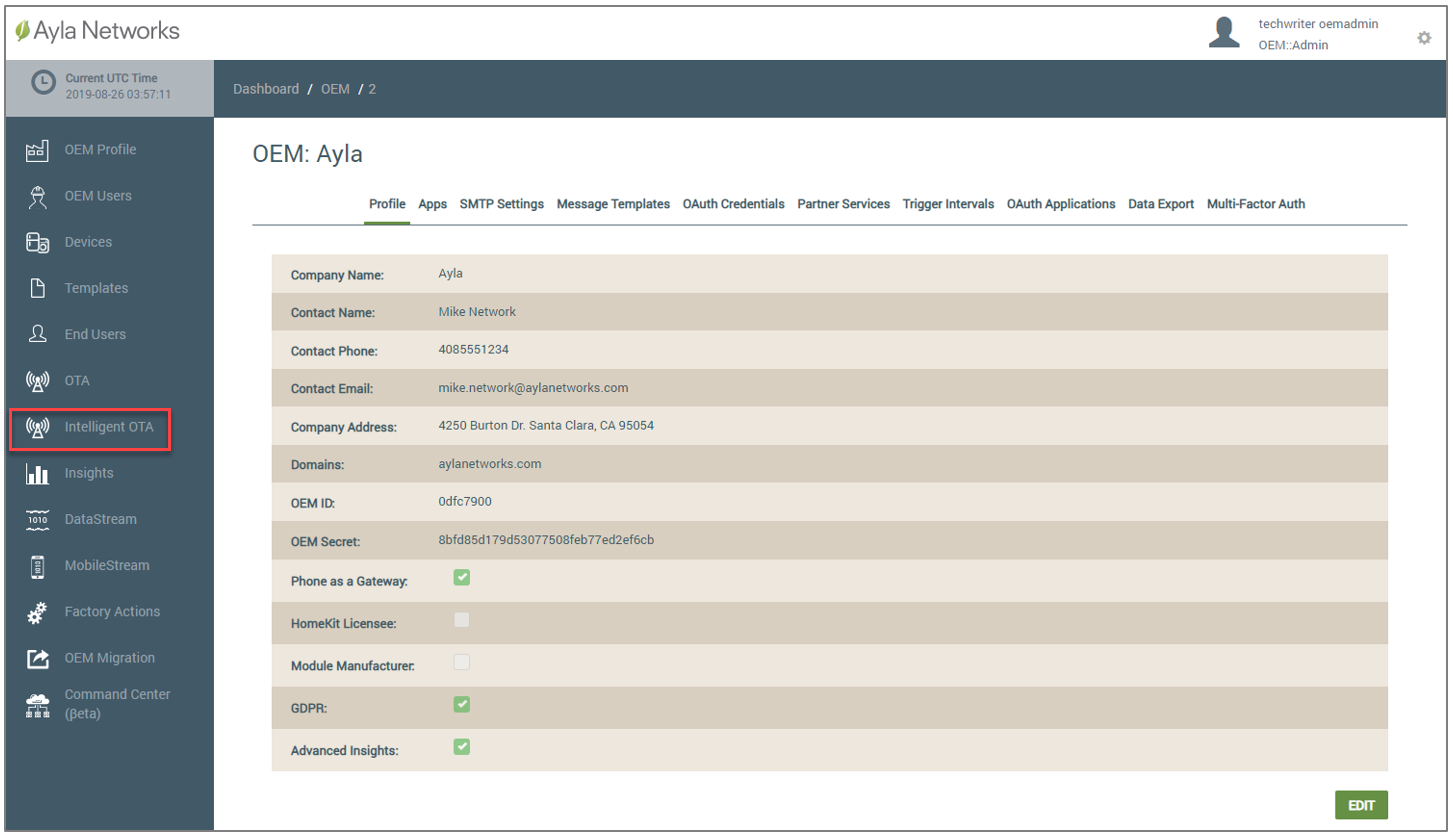
- Click Intelligent OTA in the navigation panel (on the left side of the dashboard), as shown below:
- In the drop-down for OEM Model (shown below), select the OEM model from the list. These are the model numbers of the OEM’s host application board, which are extracted from each Ayla template associated with your OEM admin role.

- Click the Host MCU OTAs tab located at the top of the OTA landing page, as shown below.

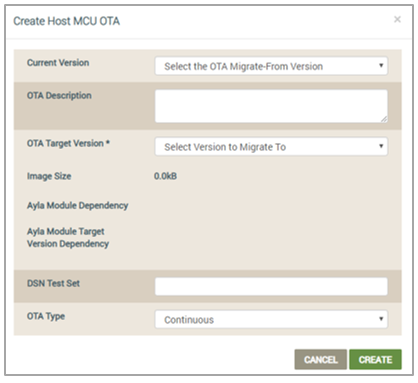
- Click the CREATE HOST MCU OTA button to open the Create Host MCU OTA dialog box, shown below:
|
NOTE |
Fields with an asterisk (*) are mandatory to complete the configuration. The other fields are optional; therefore, leaving them blank does not have any effect. |
- In Current Version (optional), select the version number of the Host MCU firmware that is on the devices that will receive this OTA update.
|
IMPORTANT! |
If you do not select a firmware version in the drop-down list for this Current Version field, the OTA update is deployed to every device that has any of the firmware versions provided in the drop-down list. |
- In OTA Description (optional), type any additional pertinent information for this OTA that may be a useful reference later, for example, “Migrate the device from 2.5 beta to 2.5.4 beta.”
- In OTA Target Version (optional), select the firmware version of the module that will be deployed by this OTA update.
|
NOTE |
Image Size displays the size of the Host MCU image file for the module you selected to receive the OTA Target Version. The file size can be used to estimate the time and effort that the device agent requires for downloading and installation. The image is stored on the Ayla platform until deleted by the user. |
- For Ayla Module Dependency (optional), select the Ayla module that has the firmware that came with the Ayla device(s) which should receive this OTA update. Specifying the Ayla module dependency is important because the module may be changed over the lifecycle of a device.
|
NOTE |
The Ayla platform filters out all other modules except for the one you selected for Ayla Module Dependency, and then deploys the OTA update only to the devices with that particular Ayla module. This is an efficient way to send firmware updates to select devices. |
- For Ayla Module Target Dependency (optional), select the Ayla module firmware release/ version to send to devices via this OTA update.
|
NOTE |
If you configure Ayla Module Dependency (in Step 9), you must also enter the version of the Ayla module firmware to deploy to those devices in the Ayla Module Target Dependency field. |
- For DSN Test Set (optional), enter as many as 50 Device Serial Numbers (DSNs) of devices in the field that will be processed by this OTA update. Use a comma (,) to separate the DSNs. This field enables you to specify an exclusive set of DSNs to test the OTA update.
|
NOTE |
You can only enter a maximum of 50 DSNs in this field and it cannot be used for Continuous OTA. The devices must meet the OTA rule criteria. |
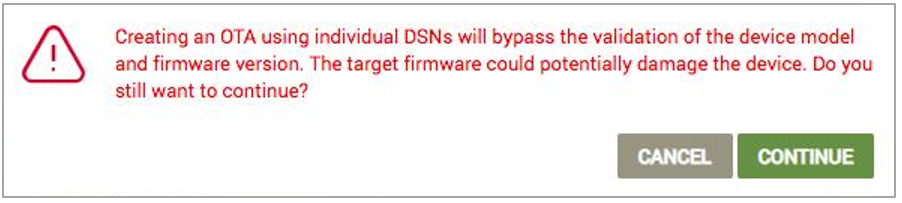
If you use the DSN Test Set option, the following error message appears to make sure that you understand how this test option affects the OTA job.
- For OTA Type (optional), select either of the following options to specify which OTA criteria should be applied to this OTA update:
- Continuous (Default) – When this OTA update is active, the Ayla platform automatically continues to evaluate which devices in the field meet the OTA criteria for this OTA update, and if new devices that match the criteria are added, the platform will identify those devices as candidates and push this OTA update at runtime to those new devices when they are online. For example, when a device connects to the Ayla cloud and it processes the device from the “unknown” to “known” state, the Ayla platform will check to see if the device meets the OTA rules for continuous OTA updates, and if the device matches the OTA rules, the OTA update is pushed to that new device.
- One Time - Once this OTA update is activated, the Ayla platform evaluates which devices match the OTA criteria for this update, and then pushes the update to those devices. This evaluation only happens one time upon activating the OTA update.
- Click the Create button to add this host MCU OTA job to the list of images that can be used in OTA updates. Or, click the Cancel button to close this dialog box without saving.
- Navigate and log in to the Ayla Customer Dashboard using your current log-in credentials.
|
NOTE |
These are the credentials you set up to register for a developer’s account. If you have not done this, refer to the Ayla Developer’s Portal User’s Guide, AY006UDP3 on Ayla Connection. |
- Click Intelligent OTA in the navigation panel (on the left side of the dashboard), as shown below:
- In the drop-down for OEM Model (shown below), select the OEM model from the list. These are the model numbers of the OEM’s host application board, which are extracted from each Ayla template associated with your OEM admin role.
- Click the Host MCU OTAs tab located at the top of the OTA landing page, as shown below.
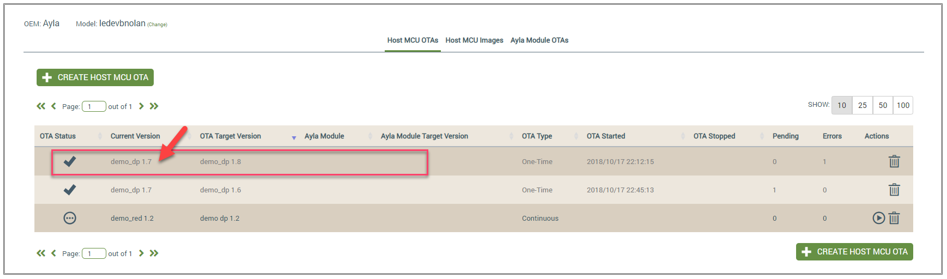
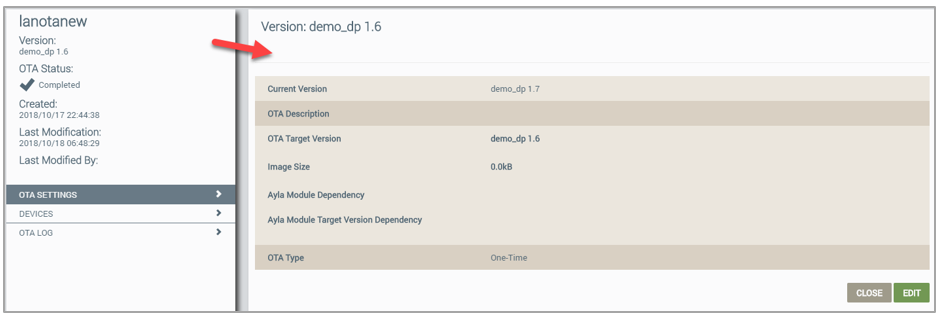
- Click the Host MCU OTA job you wish to edit, as shown below:
- On the right, notice that the page is similar to the Create Host MCU OTA dialog box; see the following as an example:
|
NOTE |
You cannot edit active OTA jobs. Stop the OTA update on the Host MCU OTAs tab to enable the editing capabilities. To do this, refer to to Actions under Manage OTAs for Host MCU Applications. |
- Click the EDIT button to display the edit view, as shown:
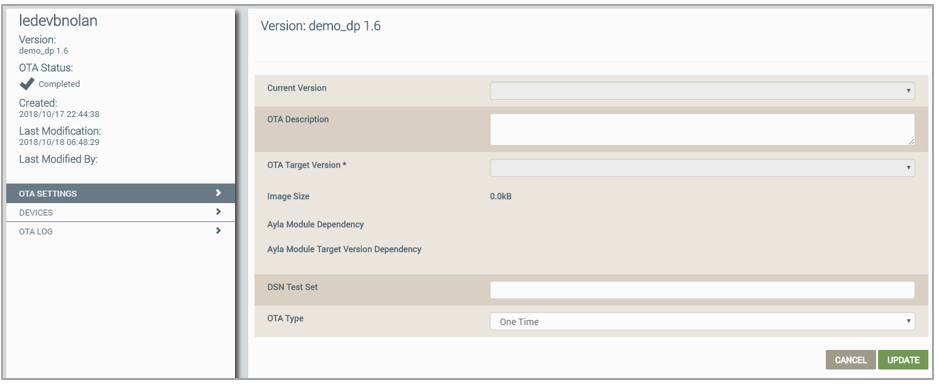
- Edit or enter new information for any of the fields in this dialog box; refer to steps 6-12 for Edit Existing Host MCU Images for an explanation of the information needed in each field.
- Click the UPDATE button to save your changes. Or, click the Cancel button to close this edit view without saving.
- Navigate and log in to the Ayla Customer Dashboard using your current log-in credentials.
|
NOTE |
These are the credentials you set up to register for a developer’s account. If you have not done this, refer to the Ayla Developer’s Portal User’s Guide, AY006UDP3 on Ayla Connection. |
- Click Intelligent OTA in the navigation panel (on the left side of the dashboard), as shown below:
- In the drop-down for OEM Model (shown below), select the OEM model from the list. These are the model numbers of the OEM’s host application board, which are extracted from each Ayla template associated with your OEM admin role.
- Click the Host MCU OTAs tab located at the top of the OTA landing page, as shown below.
- Click the Host MCU OTA job you wish to edit, as shown below:
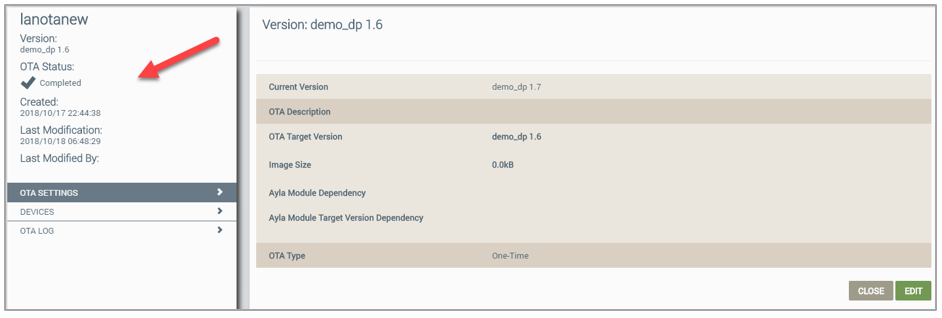
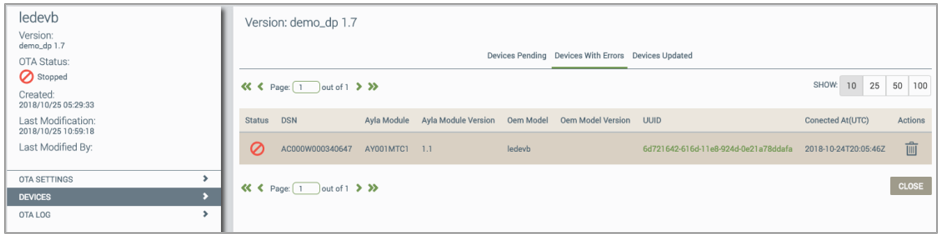
- On the left side of the page with OTA SETTINGS selected (which is the default), review the status information on the selected OTA job. Refer to the following example:
- Click DEVICES (also on left side) to view the following information on the devices for this OTA job:
- Device Pending - This tab shows all devices (as many as one million) that are scheduled to receive this OTA update (based on the definition of the OTA job).
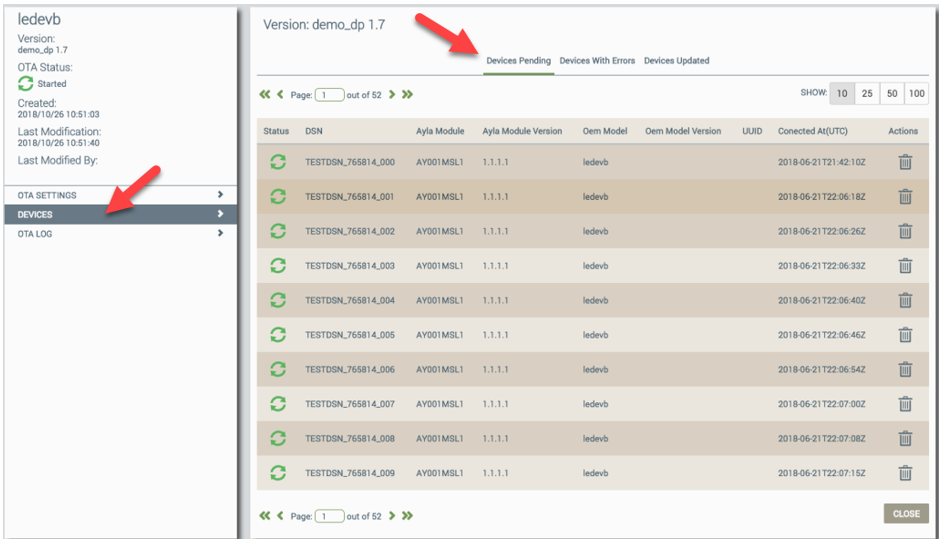
- Devices with Errors - This tab shows all devices on which the OTA update did not complete due to a hard error, such as a timeout or a device that is no longer online. Refer to the Error Codes topic.
- Devices Updated - This tab shows all the devices that have completed this OTA.
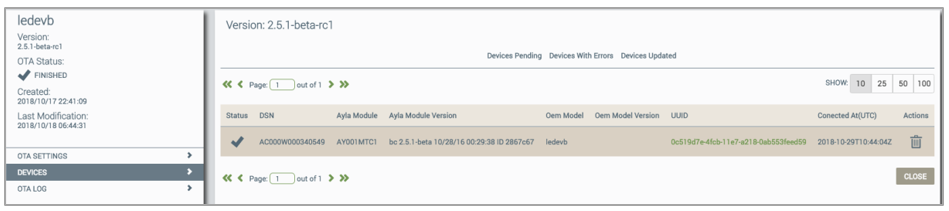
All the Devices tabs provide the following information and options:
- Status - The OTA status of the device; refer to Step 8 below for a list and descriptions of these statuses.
- DSN - The Device Serial Number of the device.
- Ayla Module - The ID of the Ayla module that is on the selected OEM model.
- Ayla Module Version - The version number of the firmware on the Ayla module, which is on the selected OEM model.
- OEM Model - the name/ID of the selected OEM model.
- UUID - The Universally Unique Identifier on the selected OEM model.
- Connected At (UTC) - The time/date stamp (in Universal Time) that the OTA job was started for this device.
- Actions - The OTA actions that you can apply to this device; refer to Actions under Manage OTAs for Host MCU Applications for the complete list and descriptions of these OTA actions.
- CLOSE - This button enables you to return to the Host MCU OTAs tab.
-
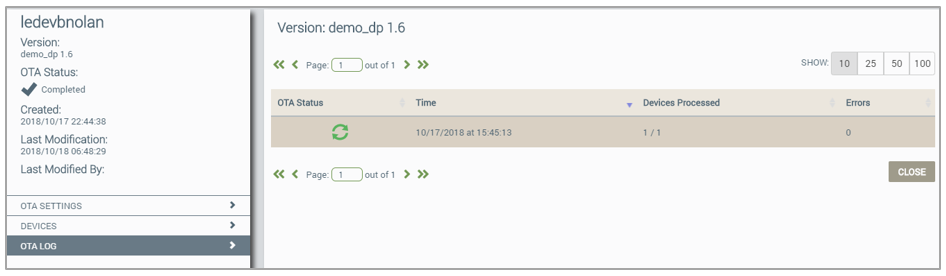
Click OTA LOG to view a history of the selected OTA job, as shown below. The OTA Log is used for debugging purposes.
- OTA Status

|
Indicates pending OTA update (not started yet). |

|
Indicates a completed OTA update. NOTE: For Continuous OTA jobs, this status may change to Active for new devices that come online and match the OTA criteria for the continuous OTA job. |

|
Indicates an active OTA update. This displays when the OTA job becomes active and remains until it is completed or canceled. |

|
Indicates that the OTA update was cancelled (or stopped). |
- Time (depends on the OTA status):
- Indicates the start time for active OTA updates.
- Indicates the stop time for stopped or cancelled OTA updates.
- Devices Processed – When the OTA update is stopped or cancelled, displays the number of devices that received the OTA update.
- Errors - When the OTA update is stopped or cancelled, displays the number of devices that had errors during this OTA update.
- CLOSE – This button enables you to return to the Host MCU OTAs tab.
All the tabs on the OTA page enable you to manage your OTA jobs remotely, so that you can, for example, report to your operations teams with a clear understanding of current and historic OTA runs. When you click Intelligent OTA in the navigation panel, the Host MCU OTAs tab displays (as shown in the example below).
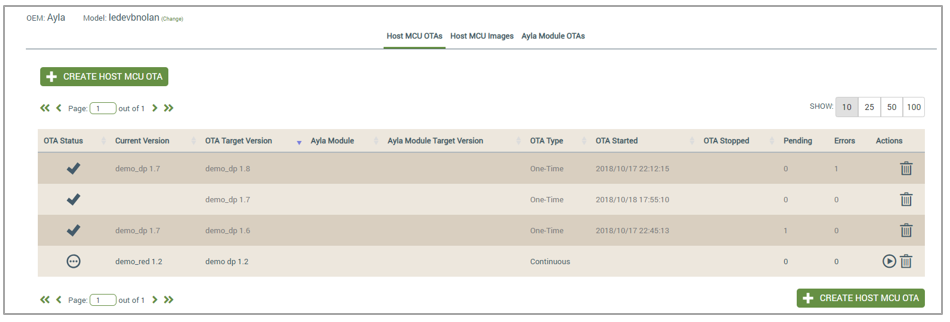
This tab provides the status and basic information on your OTA jobs, which is described below:
- OTA Status
|
|
Indicates pending OTA update (not started yet). |
|
|
Indicates a completed OTA update. NOTE: For Continuous OTA jobs, this status may change to Active for new devices that come online and match the OTA criteria for the continuous OTA job. |
|
|
Indicates an active OTA update. This displays when the OTA job becomes active and remains until it is completed or canceled. |
|
|
Indicates that the OTA update was canceled (or stopped). |
- Current Version – Displays the name/version number of the module that should receive this OTA update.
- OTA Target Version – Displays the firmware version of the module that will be deployed by this OTA update.
- Ayla Module – Displays the name/ID of the Ayla module that is on the selected OEM model.
- Ayla Module Target Version – Displays he Ayla firmware release/version that is about to be pushed to devices via the OTA update.
- OTA Type:
- Continuous – When new devices that match the criteria of this OTA job are added and online, the Ayla platform will push this OTA update at runtime of those new devices.
- One Time – This OTA update is pushed only one time to the devices that match the OTA criteria upon activating the OTA job.
- OTA Started – The timestamp for the start of this OTA job. NOTE: If the Current Version associated with this OTA job is active in another, you must stop that job before starting this one.
- OTA Stopped – The timestamp of the end of this OTA job, whether it was stopped upon completing all processing, or manually stopped for other reasons.
- Pending – The number of devices that are scheduled to receive this OTA update based on the OTA job. If a filter is applied to the OTA job, only devices within the filter range receive the update. Refer to Steps 8 and 9 under Create New Host MCU Images for a description of Ayla Module Dependency and Ayla Module Target Dependency.
- Errors – When the OTA update is stopped or canceled, displays the number of devices that had errors during this OTA update.
- Actions:

|
Click to start/activate an OTA job. |

|
Click to stop an active OTA job. |

|
Click to delete the OTA job. If the OTA update is running, a confirmation displays to make sure you want to delete this job while it is active. |
|
|
Indicates that the OTA update was canceled (or stopped). |
How to get here on the dashboard: Click Intelligent OTA in the Navigation Panel.
See also: Ayla Intelligent OTA, Access the Ayla Customer Dashboard, Default User Roles, User Roles for Access to Factory Actions, Ayla Platform OEM Type, Intelligent OTA: Device Error Codes, Intelligent OTA: Best Practices.
Please click here to let us know how we're doing. Thank you.